I just got done talking about how cool XCode and Apple is.
But now I will say how stupid hard it is to do such simple things like setting a border-radius of 50%
profileImageView.layer.frame.size.width / 2
That was too much when you could've just typed 50% or something.
Either this is really ridiculous of Apple or Sam just doesn't really know what he's doing.
Anyways, there's the finished project.
Monday, December 26, 2016
Project 12: Sticky Header Jumper
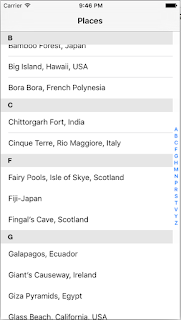
This project really showed me how cool developing Apple apps are.
The defaults that it comes with are just really amazing.
The headers are sticky by default. And there are a lot of really cool things you can do by just using a particular component.
This project also showed me how bad of a coder Sam actually is.
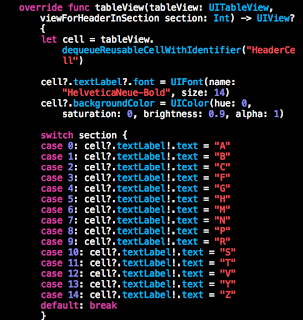
That super long switch statement could be reduced to this:
Other than the laughable code quality, the project was really fun to do.
This UI looks really nice and high quality. It's hard to put out bad looking apps because XCode restricts what you can do (and for good reason).
Project 11: Add Item
Project 10: Rearrange and Delete items
Project 9: Pull To Refresh
Man these projects are really a drag to get through.
We redid the UI from the previous project but this time we are to implement a "Pull to Refresh" functionality and replace the list with new items.
Sam honestly does a terrible job at explaining what he's doing when going through these projects.
"You do this, then do that, then do this"
Why Sam Why?
Can you explain better at why you're doing what you're doing?
Project 8: TableView
Saturday, December 10, 2016
Project 7: Add Photo
This project begins our knowledge of knowing how to access the camera.
Given that the camera is used in so many projects, it's a no-brainer that launching the camera is super easy to do.
Add you have to do is add a UIBarButtonItem and assign that to a Camera.
This little icon that will be placed in the right part of the navigation will launch the camera.
I like how XCode limits you on the customization of buttons like these. It helps developers stick with intuitive icons that have intuitive functionalities.
On the other hand, it does limit creativity.
Clicking that button gives us the Camera Roll
And selecting a photo pastes it in the View.
It's pretty nice knowing how to do something simple yet effective like this.
However if I were asked to do this without any documentation help, I would seriously have no idea...
To know all these names, I'd seriously have to code in Swift for quite some time every day.
Project 6: Passing Data
This project was simply getting contents of one view over to another view in the Storyboard.
Now I do find it a little fascinating how this gets done in XCode.
The transitions between Views are apparently called "segue"s.
This block of text was pretty much the main point of it.
I still get a little frustrated about how Sam glosses over a lot of things. For example, when he's debugging something, he just tries different things until they work. The problem is that the viewer has no idea why it worked. It's important to know why things are a certain way. But I digress.
I'll take it for what it is.
Monday, December 5, 2016
Project 5: Get Date And Time
I think the most valuable thing to learn as an iOS developer is knowing how to find the right NS-variable when needed.
However Sam honestly does a pretty bad job about teaching you how to search.
(His words)
"Let's say you don't know how to do 'Date and Time', you go the iOS developer library and type 'NSDate'"
Well Sam... how should one even know how to type "NSDate"?
Anyways this project was pretty easy.
You just take the date from NSDate(), format it using NSDateFormatter, and update the label.
I'm really curious as to why this project was placed at this point. I definitely think it should've been before the Tip Calculator.
I feel like this project had the least amount of code.
Well... onto the next one!
Project 4: Tip Calculator
This project took way longer than expected.
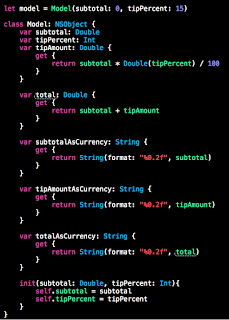
Sam begins to introduce the concept of a model.
Rather than keeping all the logic data in the view layer, he starts to put data on a Calculator "Model".
This project was when it was clear that Sam is actually a novice programmer teaching other novices how to code.
His debugging process as well as how we names his variables and goes about his coding screams "noob" (not to be mean about it though).
In this scenario, instead of naming his model "Calculator". He named it "Model".
Why would you name your model, "Model"?
Anyways not gonna get too hung up on it.
This whole Swift development seems a lot more feasible now.
However it is difficult to know all these different Swift elements and triggers.
Ex: UISlide, resignFirstResponder().
But it's nothing that I won't pick up as long as I keep doing this.
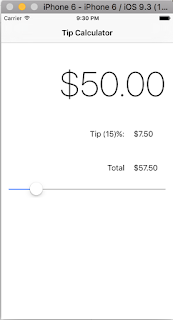
It is really nice making a useful app like the TipCalculator.
I really do wonder what it's like to work in a Production level iOS project.
At work I'm currently working on a React Native app which keeps things pretty clean.
Friday, November 25, 2016
Project 3: Custom Settings
This particular project took much much longer than it was supposed to.
Don't you hate it when a tutorial says: "Do this, do that, then it should just work"... and when you do it, it doesn't work.
My problem was that certain syntax that were used were not available on the version that I was using (7.2). I had to upgrade.
In order to install 8.0, I also had to upgrade my Operating System to Sierra. Which takes a fucking lot time to do.
However when I upgraded to XCode 8.0, I had other problems.
Then I had to uninstall XCode, find 7.3 and manually install that one instead of going through XCode.
Once I did that, everything worked easy and according to the tutorial videos.
END RANT
Alrighty so this project was about custom settings.
When you open the settings app on your iPhone there are a list of apps in which you can change a list of settings.
This project taught you how to make your app show up in the Settings app, display a list of customizable settings, then make updates based on what the setting is set to in the app.
What this project did was to put a simple "Notes" application and set it to Night Mode and back to the Default mode.
Here are some cool screenshots:
This is what my projects settings were in the "Settings" app.
The Default View
Once I flipped the Setting to True.
The app would now be in Night Mode.
This was pretty cool and now I understand how apps like Google Maps switches over to this dark version when it's dark outside.
Some hardware detects that there isn't much light and therefore flips a setting. Then based on that flipped setting, there are code changes that are made to alter the User Interface of the application.
Pretty neat stuff here.
Just felt like I leveled up.
Thursday, November 17, 2016
Project 2: Counter
The first project that I built was a simple Counter App.
It has two buttons.
One button that increments a counter and one to reset it back to 0.
Sam first takes us through building the interface by dragging and dropping element onto a page ("Storyboard").
From the list of possible items, it looks as though there aren't many options to choose which could explain why a bunch of apps look like they have the same buttons and text.
After the interface was all built he guides us in building the code that is used to make things change.
Here's a screenshot of the split view.
And then here is the finished product of my app.
To conclude I must say that I appreciated how Sam took the time to explain very basic things to the viewer. As a developer with 2+ years of experience, I don't realize what things may not be quite so intuitive to a user. And because of that I would definitely recommend this course so far.
It helps that Sam built this project right after learning how to build these apps.
Wednesday, November 16, 2016
Project 1: XCode
Alrighty so here I am writing another blog.
The point of the blog is for 2 reasons
1. To keep myself motivated! If I know people are reading my blog then I feel like I have to finish what I started.
2. To show others that it's tangible to achieve what I did. Just follow my footsteps!
Without further ado, let's get started.
I'm following along this project called 100 Days of Swift created by a guy named Sam Lu, you can find it here: http://samvlu.com/.
Basically this guy taught himself how to code in Swift and then proceeded to create the tutorial he wishes he had when he was learning. Pretty much what I did with my coding bootcamp blog. I wish someone wrote a coding bootcamp blog so I can see what they do every single day.
Anyways this guy is making 60 bucks with every purchase so good for him.
Here is the first section:
This very basic intro went over the simple installation of XCode as well as the basic controls of the XCode.
This is the UI of XCode. What makes it daunting is that none of the buttons have any labels on them. So unless you can magically figure out what all the icons mean, you will have trouble knowing right away what all the buttons do.
Sam does a great job of going over just a handful of cool tricks, but not so much that your brain will get overloaded.
I can really appreciate that as so many tutorials try to cover every fucking button and view. Which is pointless because you don't even remember it all.
Anyways that's it for today. I'll post more when I get to it.
Subscribe to:
Posts (Atom)